Tools:
The Designer (JNGBCDesign)
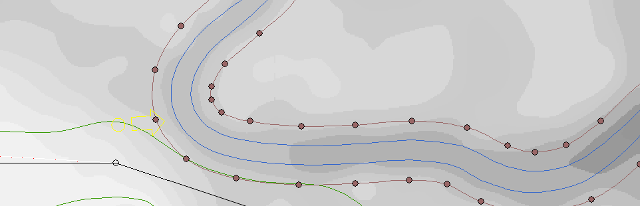
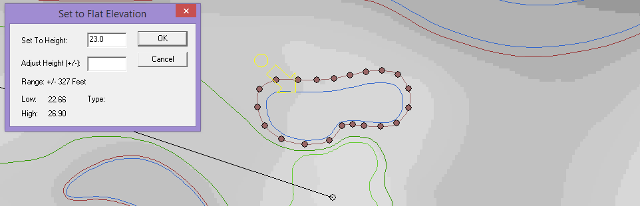
The terrain surface of lakes in nature are flat and occupy depressions in the landscape. As a player of the game, not just a designer, I have frequently encountered lakes that disregard both of these facts. The question is, how do you create a flat lake? It can be tricky especially if you position a lake close to a fairway or green, which is desirable to challenge the player. I begin by making a copy of the water shape, change it to terrain, expand it by eight to ten feet, and position it as shown in the figure below. Then, after finding the lowest elevation under the terrain shape, I Shift key + Click any of the flatten tools and enter a value in the Set To Height input box.
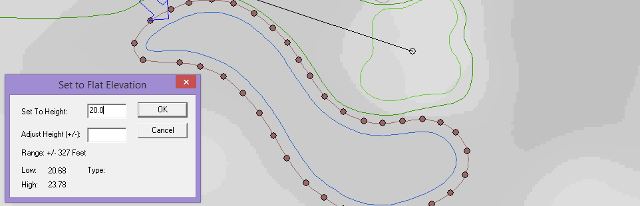
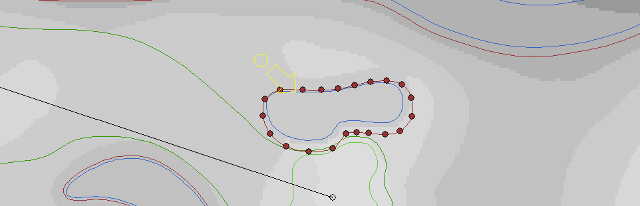
Flattening the terrain well outside of the water shape goes a long way to obtaining our objective, but I'm not finished yet. I want to deepen the depression the lake occupies. The next steps involve shrinking the terrain shape by two to three feet prior to repeating the flatten operation, decreasing the flatten value anywhere from one half to one foot. This procedure is repeated x number of times as needed. This results, of course, in a jagged ring of terrain surrounding the lake which often requires smoothing. To accomplish this I will expand the terrain shape again, prior to smoothing, to cover the affected area as shown in the figure below

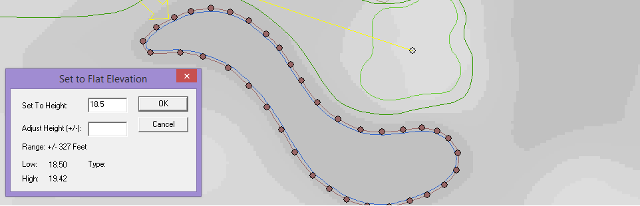
Lastly, I create a new copy for the terrain shape, expand it by one or two feet, and position it as shown in the figure below. I will do one final flattening setting the value in the input box to the common elevation for the lake and then change the terrain shape to hazard, using either a stock texture or a custom one. The animated image below right depicts all of the steps taken in this section.
For this example I've replaced the greenside bunker with a pond situated quite close to the green. On some real golf courses a feature like this might have a retaining wall of natural or man-made stone, or wooden structures like rail ties. To simulate this feature I begin by making a copy of the water shape, change it to terrain, expand it by four to six feet, and position it as shown in the figure below. I then flatten the area under the terrain shape, using a value for the Set To Height input box approximately two to four feet lower than the minimum elevation.
To simulate a rock wall I now change the terrain shape to hazard and reposition it as shown in the figure below. One could use a lava shape for the rock wall, but that is not a simple approach for this example since lava has a higher priority than water. Suffice it to say that if the cyber-golfer mishits their approach far enough left, their shot will be deflected and come to rest in the hazard or the water.
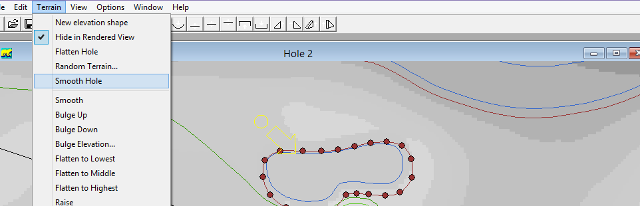
You could stop at this point with the somewhat jagged vertical wall the Designer produces, but I prefer to employ the Smooth Hole option under the Terrain menu as revealed in the figure below. This terrain smooth function is far less aggresive than the normal smooth operation available from the tool bar. Just a couple clicks will improve the look of the rock wall while maintaining the flattness of the pond, as illustrated in the animated image below right.

I know this is stating the obvious, but streams are features in nature where water flows downhill through channels cut into the terrain. Call it an eccentrity of mine but I like to simulate this into my designs. The procedure for creating a lake in the first section above could be used for streams and no one would be the wiser, but I will employ a different approach.
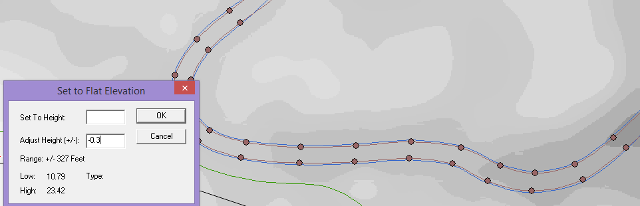
I begin by making a copy of the water shape, change it to terrain, shrink it by one to two feet, and position it as shown in the figure below. Then Shift key + click any of the flatten or lower icons on the terrain tool bar, I enter a value of -0.3 feet in the Adjust Height input box. This operation lowers the elevation in the affected area of the terrain shape. It doesn't flatten to an absolute value as was done for the lake terrain. A very smart addition by those who coded JN6, don't you think?
Next I will repeat the above lowering step several more times after shrinking the terrain shape by one to two feet with each iteration. This will result in a gradual deepening of the channel which I can monitor on the Rendered View window. Eventually one reaches a point where the terrain shape cannot be shrunk any further without strange and unwanted changes occurring. I have reached that point as shown in the figure below. Before I go on to the next step, I want to make a copy of the current terrain shape.
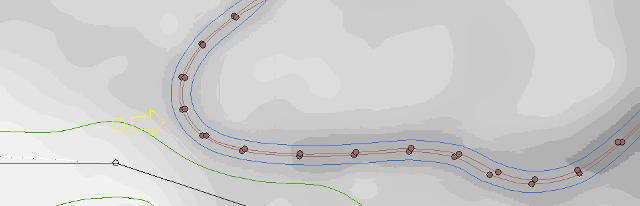
It is now necessary to expand / stretch the terrain shape some 35 to 40 feet prior to smoothing, as shown in the figure below. This should be adequate to encompass the entire area affected by the previous terrain operations. It is sometimes necessary to manually edit a shape by moving some segments or vertices. Lastly, using the copy of the terrain shape from the previous step, I perform one final lowering which will give the stream bank a broken appearance. The image below right illustrates all of the steps taken for this example.