Using GhostIt and Google Earth to recreate a real golf hole
Lesson 2: Recreating the Hole Terrain
Tools:
Image Editor.
GhostIt for transparency function.
Google Earth to plot elevations.
The Designer (JNGBCDesign).
Are you ready for even more tedious work? The next stage involves using Google Earth to assist in plotting elevation data points using your image editors text tool. I daresay most of you would probably not bother being so precise and, if that sums up your position, you may as well stop here.
- Launch Google Earth, locate the real course you are recreating (I use the handy search function), and zoom in on the hole you are working on.
- Launch your image editor and open the Google Earth image of the hole you acquired in Lesson 1. You did save it, I hope?
- In the next steps you will be switching between Google Earth and your image editor from the taskbar.
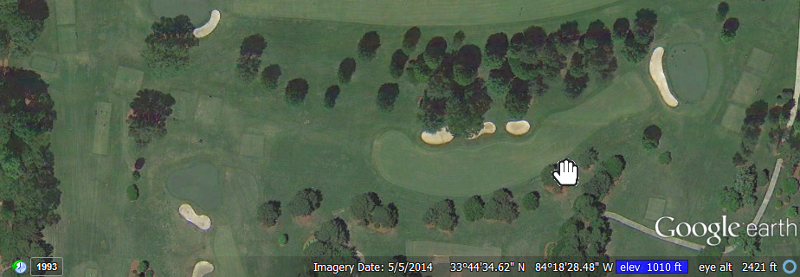
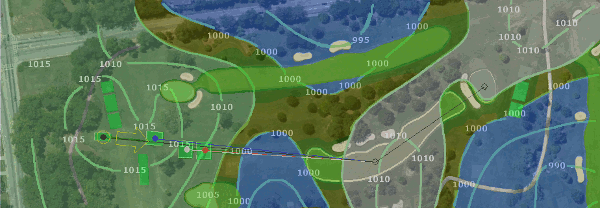
- In the Google Earth window move the hand icon pointer over the hole making note of the elevation data as illustrated below:
- Switch to your image editor, locate the position on your image of the hole and record the elevation data using the text tool.
- Repeat steps 4 and 5. The more data points you acquire, the more accurate will be your terrain rendering.
- Using your image editors line or pencil tool (freehand), connect the data points to create a contour map. I like to use a color much lighter than the background image.
- When you are quite happy with the result, save the image using a new filename (e.g. hole5_elevations).
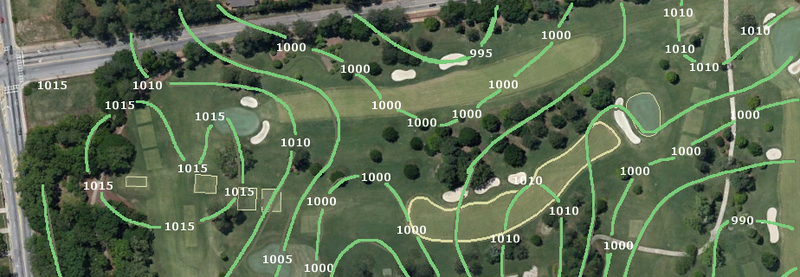
- If you look at the illustration below you can see how many data points I collected, and that I worked in increments of five feet.
You can now exit the Google Earth application for this part of the lesson.
- Launch the Designer and open the hole you are working on.
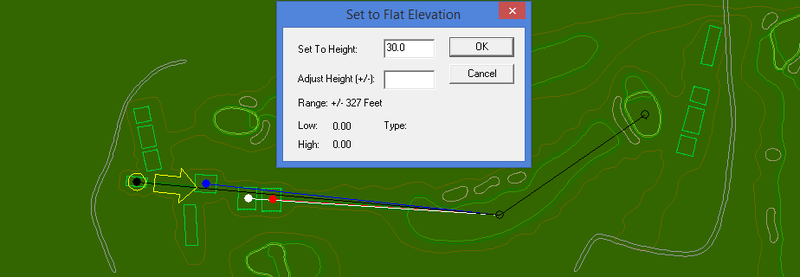
- Now I am going to set the base elevation to something other than 0.0. I use the formula, base elev (feet) = highest - lowest + 5. For this excercise, using my example hole, I am going to set the base elevation to 30 feet.
- Right click on the hole design window, select Terrain, and then New elevation shape.
- Draw the terrain shape by left clicking once on three corners of the hole design window and double clicking on the last corner.
- Right click (or DblClk) and select Change Shape Type.
- Enter 25 in the Stretch Shape Amount input box. This will insure the base elevation extends beyond the hole design window.
- Since the terrain shape obscures the entire hole design window I like to switch to Outlines under the view menu for the next couple of steps.
- With the terrain shape selected, hold the Shift key down and click on any of the flatten tools (or the Raise / Lower tools) in the Designers toolbar menu.
- In the Set to Flat Elevation input box, enter the base elevation for the entire hole.
- Next we need to increment and decrement from the base elevation by five foot intervals. I use the Desert Rough shape to increment and the Water shape to decrement, but first we need to remove the existing terrain shape.
- Click anywhere in the hole design window and press the Delete key. Poof, the terrain shape is gone.
- Launch GhostIt. The icon will reside in your system tray.
- Right click on the GhostIt icon in the system tray and select Ghost.
- Move the GhostIt icon and left click on the hole design window. GhostIt is configured for 50% transparency.
>
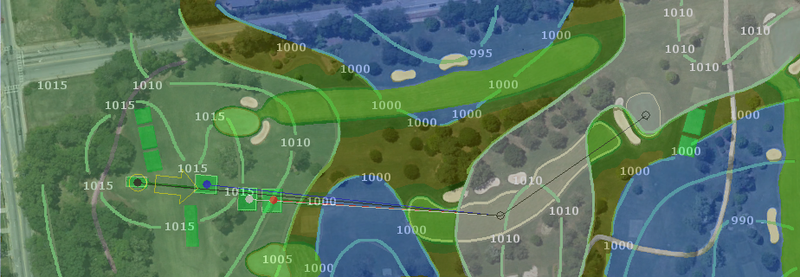
- Move the hole design window to overlay the image window in such a way that the existing shapes (bunkers, fairways, and greens) line up with those in your image editor window.
- I think it is probably easiest to see how I proceed by looking at the illustration below. I have encompassed all the areas in the hole design window that are equal or greater than the 1005 foot contour line with Desert Rough shapes. And I have encompassed all the areas that are equal or less than the 1000 foot contour with Water shapes.
- Click on each Desert Rough shape (assuming there are more than one), hold the Shift key down and click on any of the flatten tools.
- In the Set to Flat Elevation input box, enter the value (new elev. = current elev. + 5 feet).
- Repeat this for each Water shape but enter the value (new elev. = current elev. - 5 feet).
- Delete all of the Desert Rough and Water shapes, redraw for the next contours and repeat steps 21 to 23 until finished (see animation below). Just be aware when clicking on shapes that you do not inadvertently click on those that have higher priority or you can really mess up.
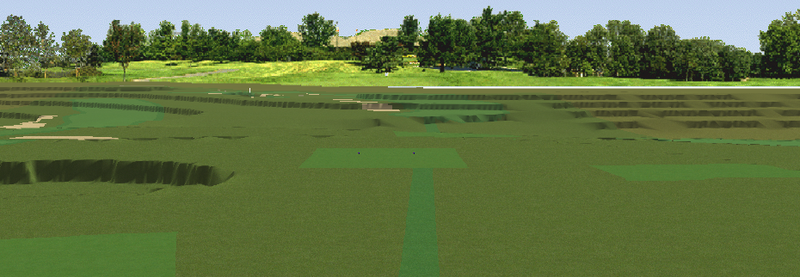
- The illustration below shows the rendered view before smoothing using the tower camera.
- Repeat steps 10 to 13 above to cover the entire hole with Terrain shape.
- Perform 15 power smooths (hold the Shift key down while clicking on the Smooth icon). This action has no effect on elevations outside the hole design window, but the next step does.
- Perform 15 to 20 normal smooths.
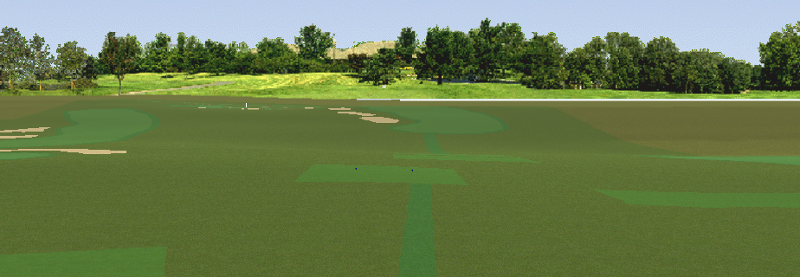
- The final illustration shows the rendered view after smoothing.
<--Page 1
-->Design Home